
Best Eyeliner Techniques for Every Eye Shape: From Hooded to Almond
Perfect eyeliner techniques can make a big difference and impact on the natural shape of the eyes. Each eye shape has its own charm and look. Different techniques and tricks can enhance and balance the eyes’ natural features. Here are some of the best eyeliner techniques for every eye shape. Take a look at that:
Find Your Eye Shape
Before applying eyeliner, it’s important to identify your eye shape.
Almond Eyes:
Almond eyes are slightly pointed at the outer corners and well-balanced. Most eyeliner style suits this eye shape.
Almond Eyes Eyeliner Techniques:
- Draw a smooth and thin line along the upper lashes.
- Make a little thicker line around the outer corner.
- A winged or classic cat-eye liner enhances the beauty of almond eyes.
Round Eyes:
Round eyes have a wide and open appearance. Our goal is to make them bigger and more open using eyeliner.
Round Eyes Eyeliner Techniques:
- Start by applying a thin line from the middle of the eyelid instead of the inner corner.
- Gradually increase thickness as you move outward.
- Use a soft and extended wing to make the eyelid look more oval.
- Use a darker pencil to make a line on the waterline.
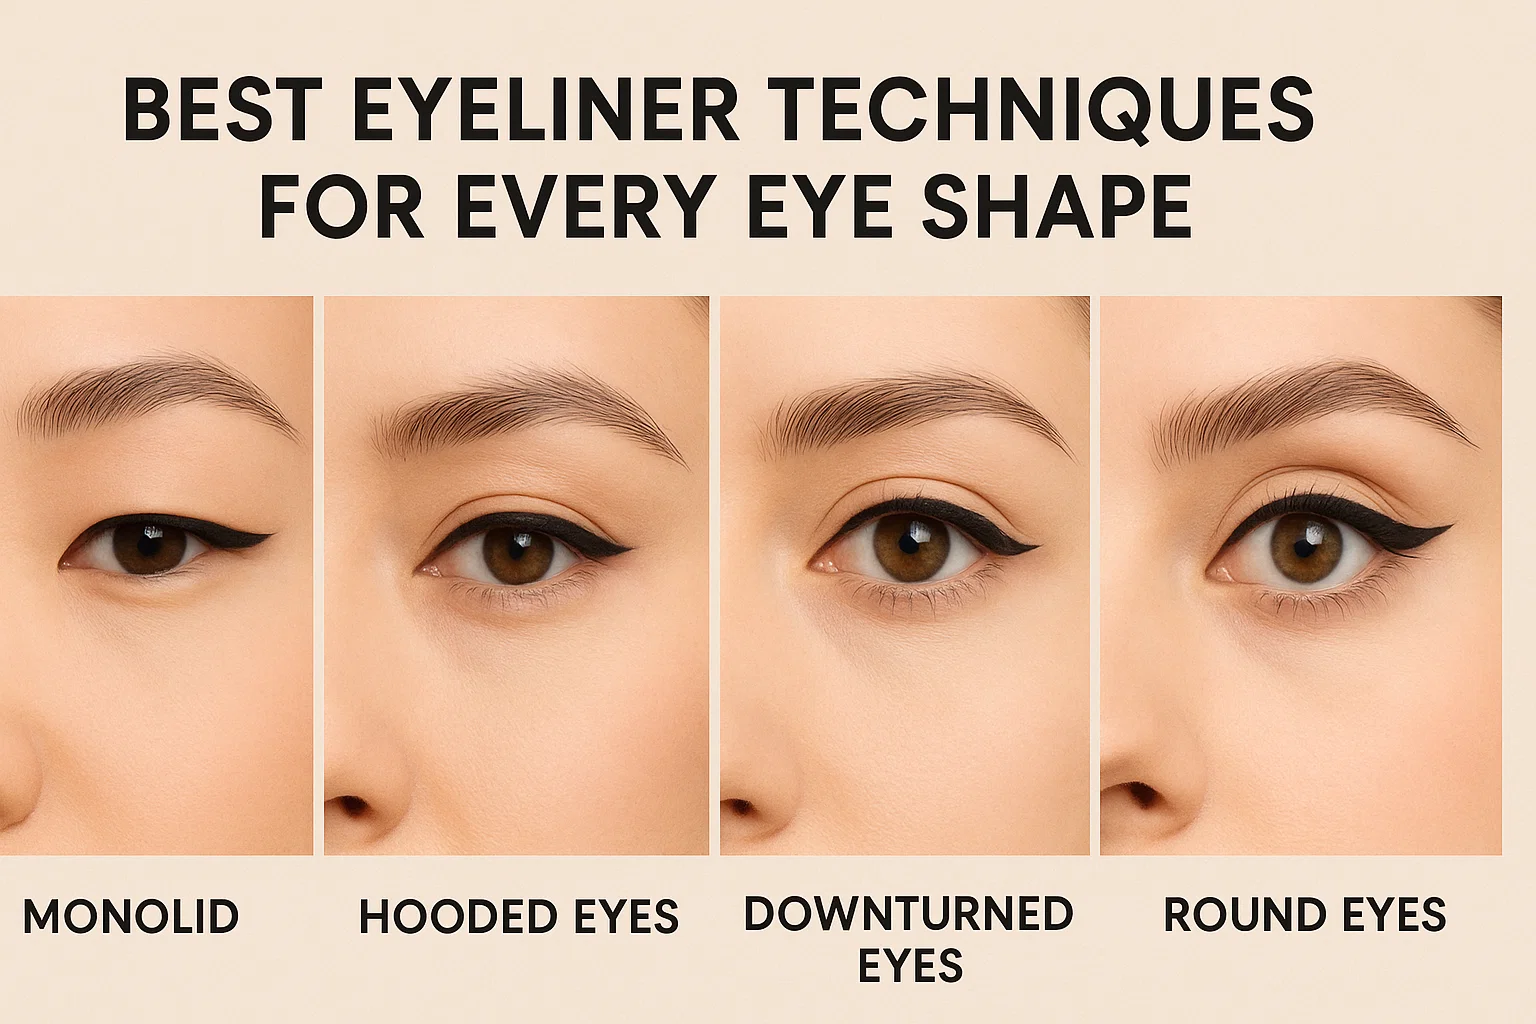
Hooded Eyes:
Hooded eyes partially cover the eyelid with a fold of skin. It makes the eyeliner less visible.
Hooded Eyes Eyeliner Techniques:
- Keep the eyeliner thin and close to the lashes.
- Create a small or sharp wing that’s visible when eyes are open
- Only draw lines with eyes open to ensure proper placement around the hood
- Always use waterproof liner to prevent smudging on the hood
Monolid Eyes:
Eyes with a Monolid shape have a smooth eyelid withouta a visible crease.
Monolid Eyes Eyeliner Techniques:
- To make eyeliner visible when the eyes are open, it is recommended to use a thicker line.
- Start from the thin line near the inner corner and slightly make it thicker as you move outward.
- A straight-winged, bold line or smudged pencil looks perfect.
Downturned eyes:
This eye shape tilts downward at the outer corner. Our goal is to lift the eyes using eyeliner.
Downturned Eyes Eyeliner Techniques:
- Start with drawing a thin line from the inner corner.
- As you move to the outer third of the eyes, draw the line upward to create a lifting effect.
- A soft, upward wind can enhance the look and brighten the face.
Upturned Eyes:
An upturned eye shape is naturally lifted upward at the outer corner. Our goal is to make them look adorable.
Upturned Eyes Eyeliner Techniques:
- Start by lining the upper eyelash line with a straight stroke.
- Slightly extend the liner at the outer corner.
- To look balanced, gently smudge a smaller amount of eyeliner or eyeshadow on the outer corner of the lower lash line.
Wide-Set Eyes:
This eye shape has more space between the eyes. People with wide-set eyes look more attractive when the focus on their eyeliner is brought inward. It makes the eyes look closer.
Wide-Set Eyes Eyeliner Techniques:
- Start applying eyeliner at the inner corner.
- Draw a smooth line along the lash line.
- Make the line thicker when moving in the inner third.
Close-Set Eyes:
Close-set eyes have less space between them. By adding width, our main goal is to make them look balanced.
Close-Set Eyes Eyeliner Techniques:
- Draw a line at the outer half of the eyes.
- Start drawing the eyeliner from the middle of the eye and end with a small wing.
- Keep the inner corners light.
Helpful Eyeliner Tricks
- Always choose the right products, such as pencil eyeliner, liquid eyeliner, and gel eyeliner.
- Don’t draw the whole line at once. Try with small strokes for better control.
- Keep your hand steady.
- Use a mirror at eye level.